
1. Introduction
BluSi is a mobile access control application for buildings, houses, apartments, offices, shops, garages and more. Open accesses directly from your phone, manage users and grant access to other users, by request or with a temporary code.
The app is available on iOS (App Store) and Android (Google Play) in two languages: French and English.
- BluSi Box Admin : Configures spaces on a BluSi Box, assigns space admins. Sees only the space admin name per space, not the other members.
- Space Admin : Manages users inside their own space (add, remove, rights).
- User : Opens authorized BluSi Boxes. Can grant access to visitors.
- Anonymous : No account. Can request access via the virtual intercom on public doors.
- Space : Brings together users sharing one unit, e.g. the Martin family on the 2nd floor, Dr. Y's office, Mr. Z's law firm.
- User : A person with access to a space: tenant, office employee, recurring contractor (cleaner, gardener, etc.).
- Public door : Building entrance visible on the virtual intercom. Anonymous visitors can see spaces and users marked as visible and request access.
- Private door : Apartment door, garage, cellar, technical room, common room. Visible only to users who are members of a space linked to it. No anonymous access requests.
- Space with public-door access : 30 CHF/year. Grants access to at least one public door of the site and to all private doors of the same site.
- Space with private-door access only : 15 CHF/year. Grants access only to private doors of the site. Ideal for a parking-only renter without an apartment.
- Contract : Links a customer (property manager, owner, company) to one or more BluSi Boxes, with the rates, max space count, and maintenance option.
- Maintenance : Optional 200 CHF/year/BluSi Box contract covering at least one replacement. Becomes mandatory as soon as a BluSi Box manages more than one space.
2. Installation & Login
You can use BluSi without an account. An account is only needed to manage users or receive access invitations.
Search for "BluSi" on the App Store (iOS) or Google Play (Android) and install the app.
Open the app and create an account with your email address. Your phone will be automatically registered as a personal device.
Enter your email address and password to access your account.
If someone has invited you, go to Profile > Accept an invitation and scan the QR code or enter the code manually.


3. App Navigation
The BluSi app is organized around three main tabs accessible from the bottom navigation bar:
- Notifications : Pending access requests and history (logged-in users only)
- Map : Interactive map with all your BluSi Boxes
- Profile : Your personal information, settings and BluSi Box management


4. Map & Door Opening
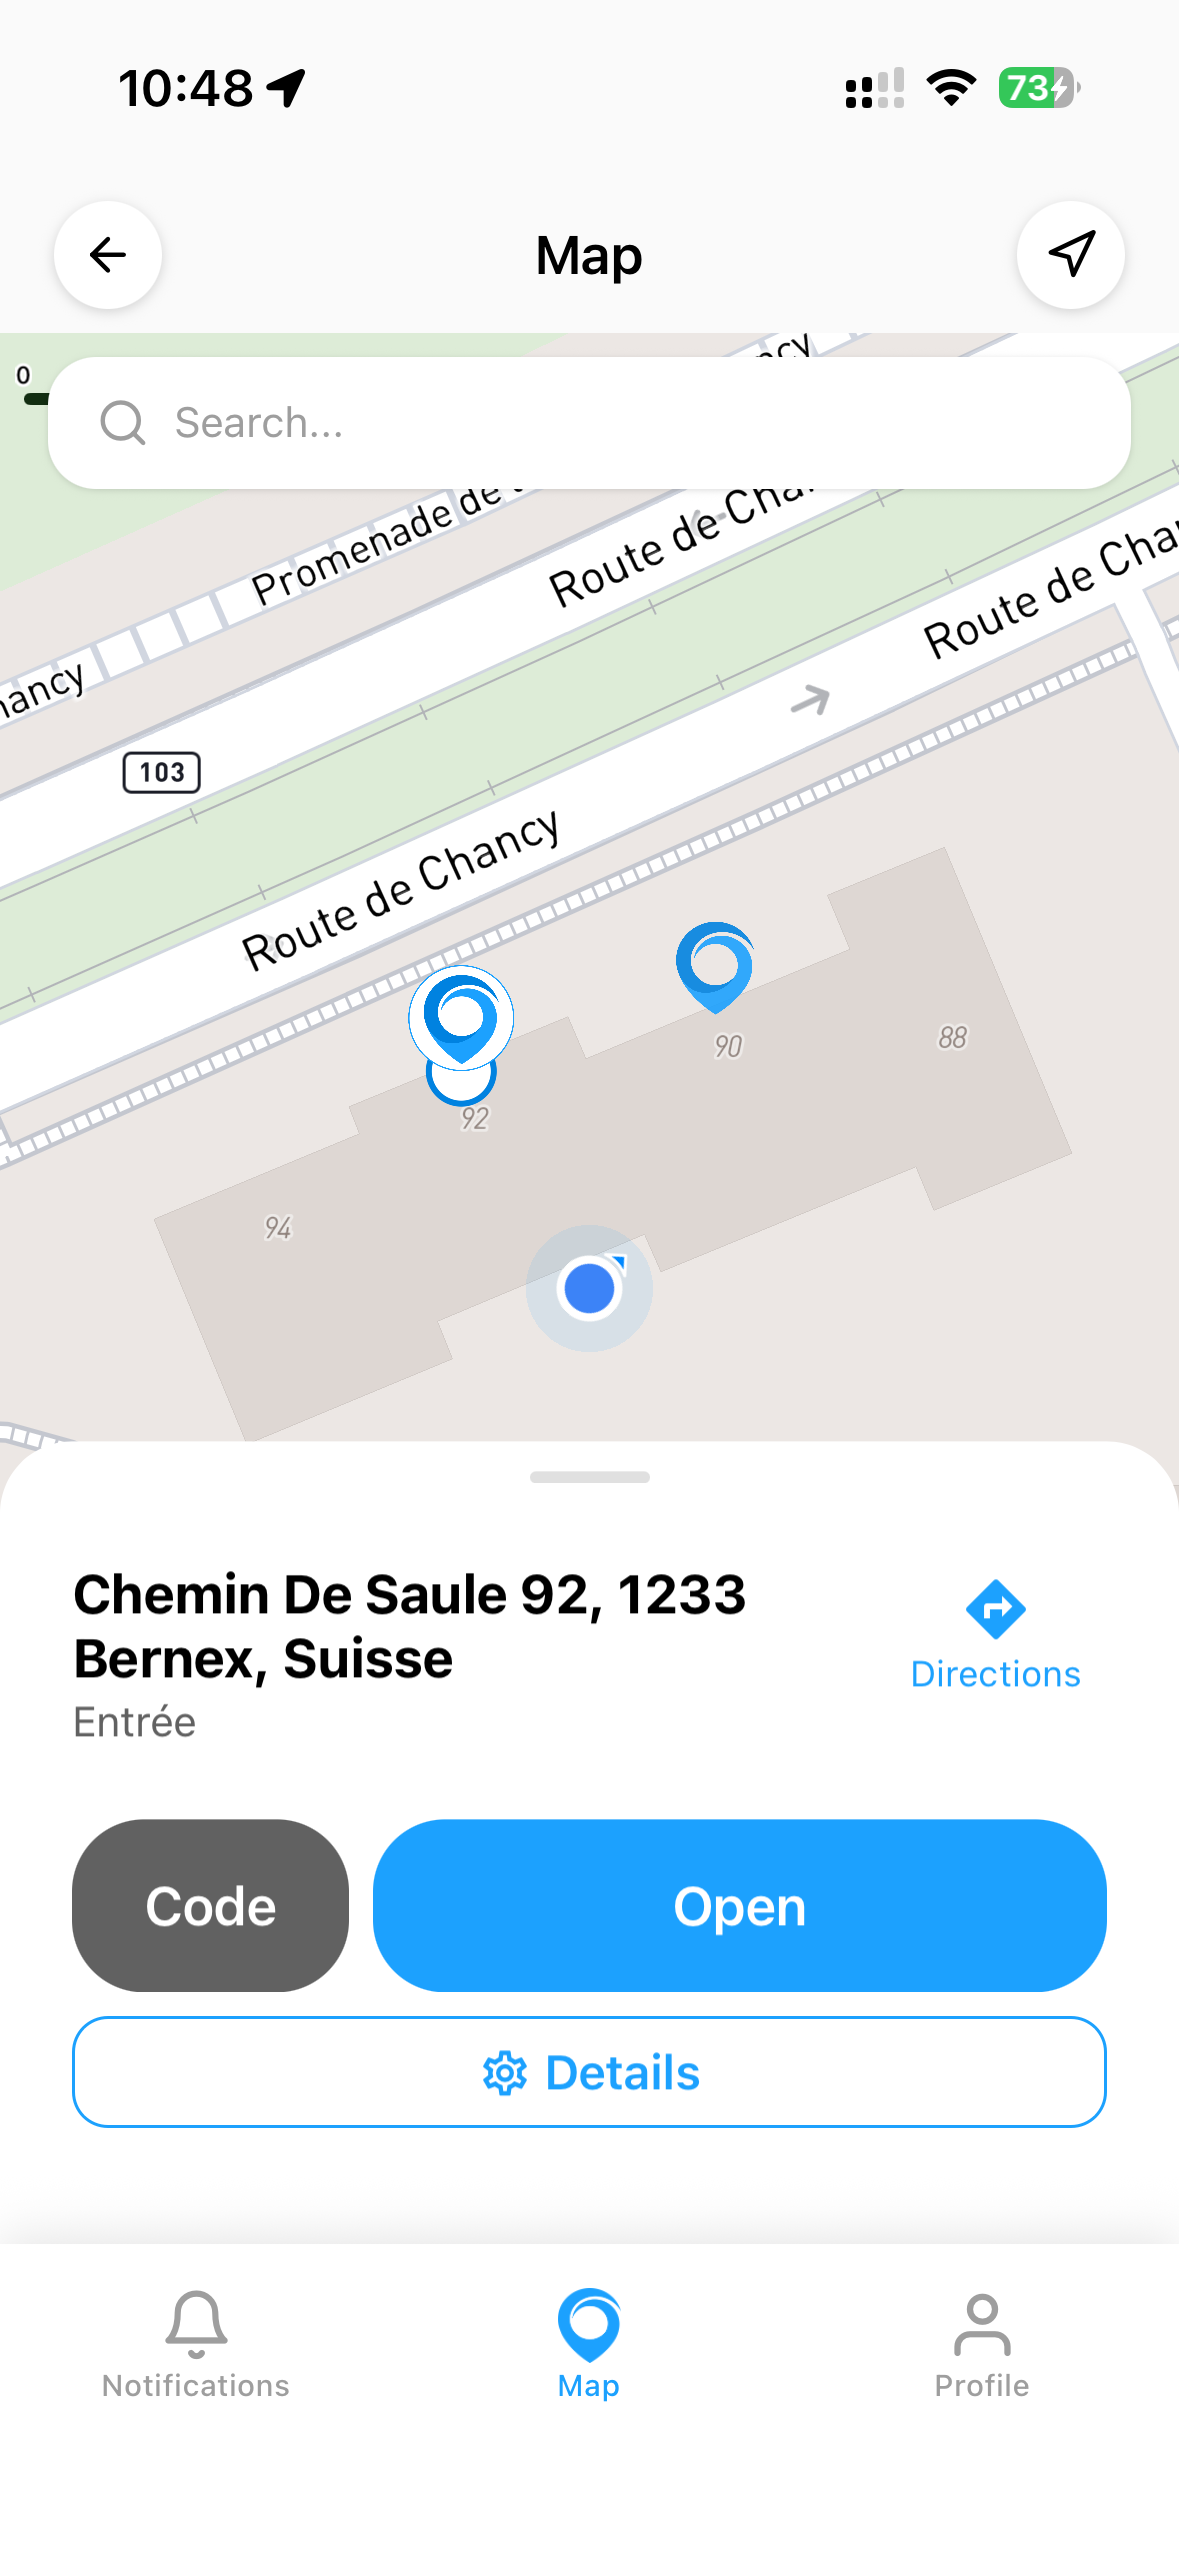
The map is the main screen of the app. It displays the BluSi Boxes you have access to, as well as publicly visible ones.
4.1 Open a door
To open a door, tap on the BluSi Box marker on the map, then tap the Open button. The door opens via Bluetooth: you need to be nearby (about 10 metres).

4.2 Door clusters
When multiple BluSi Boxes are close together, they are grouped into clusters on the map. Tap on a cluster to see the list of available BluSi Boxes at that location.


4.3 Directions
Tap the Directions button on the BluSi Box card to open your navigation app and get guided to the door.

4.4 Using a temporary code
If you have received a temporary code (4 digits), tap the Code button on the BluSi Box card and enter the code to open the door.

4.5 Request access
If you don't yet have access to a BluSi Box visible on the map, you can send an access request with a message or via video call. Authorized users will receive a notification and can accept or decline your request.

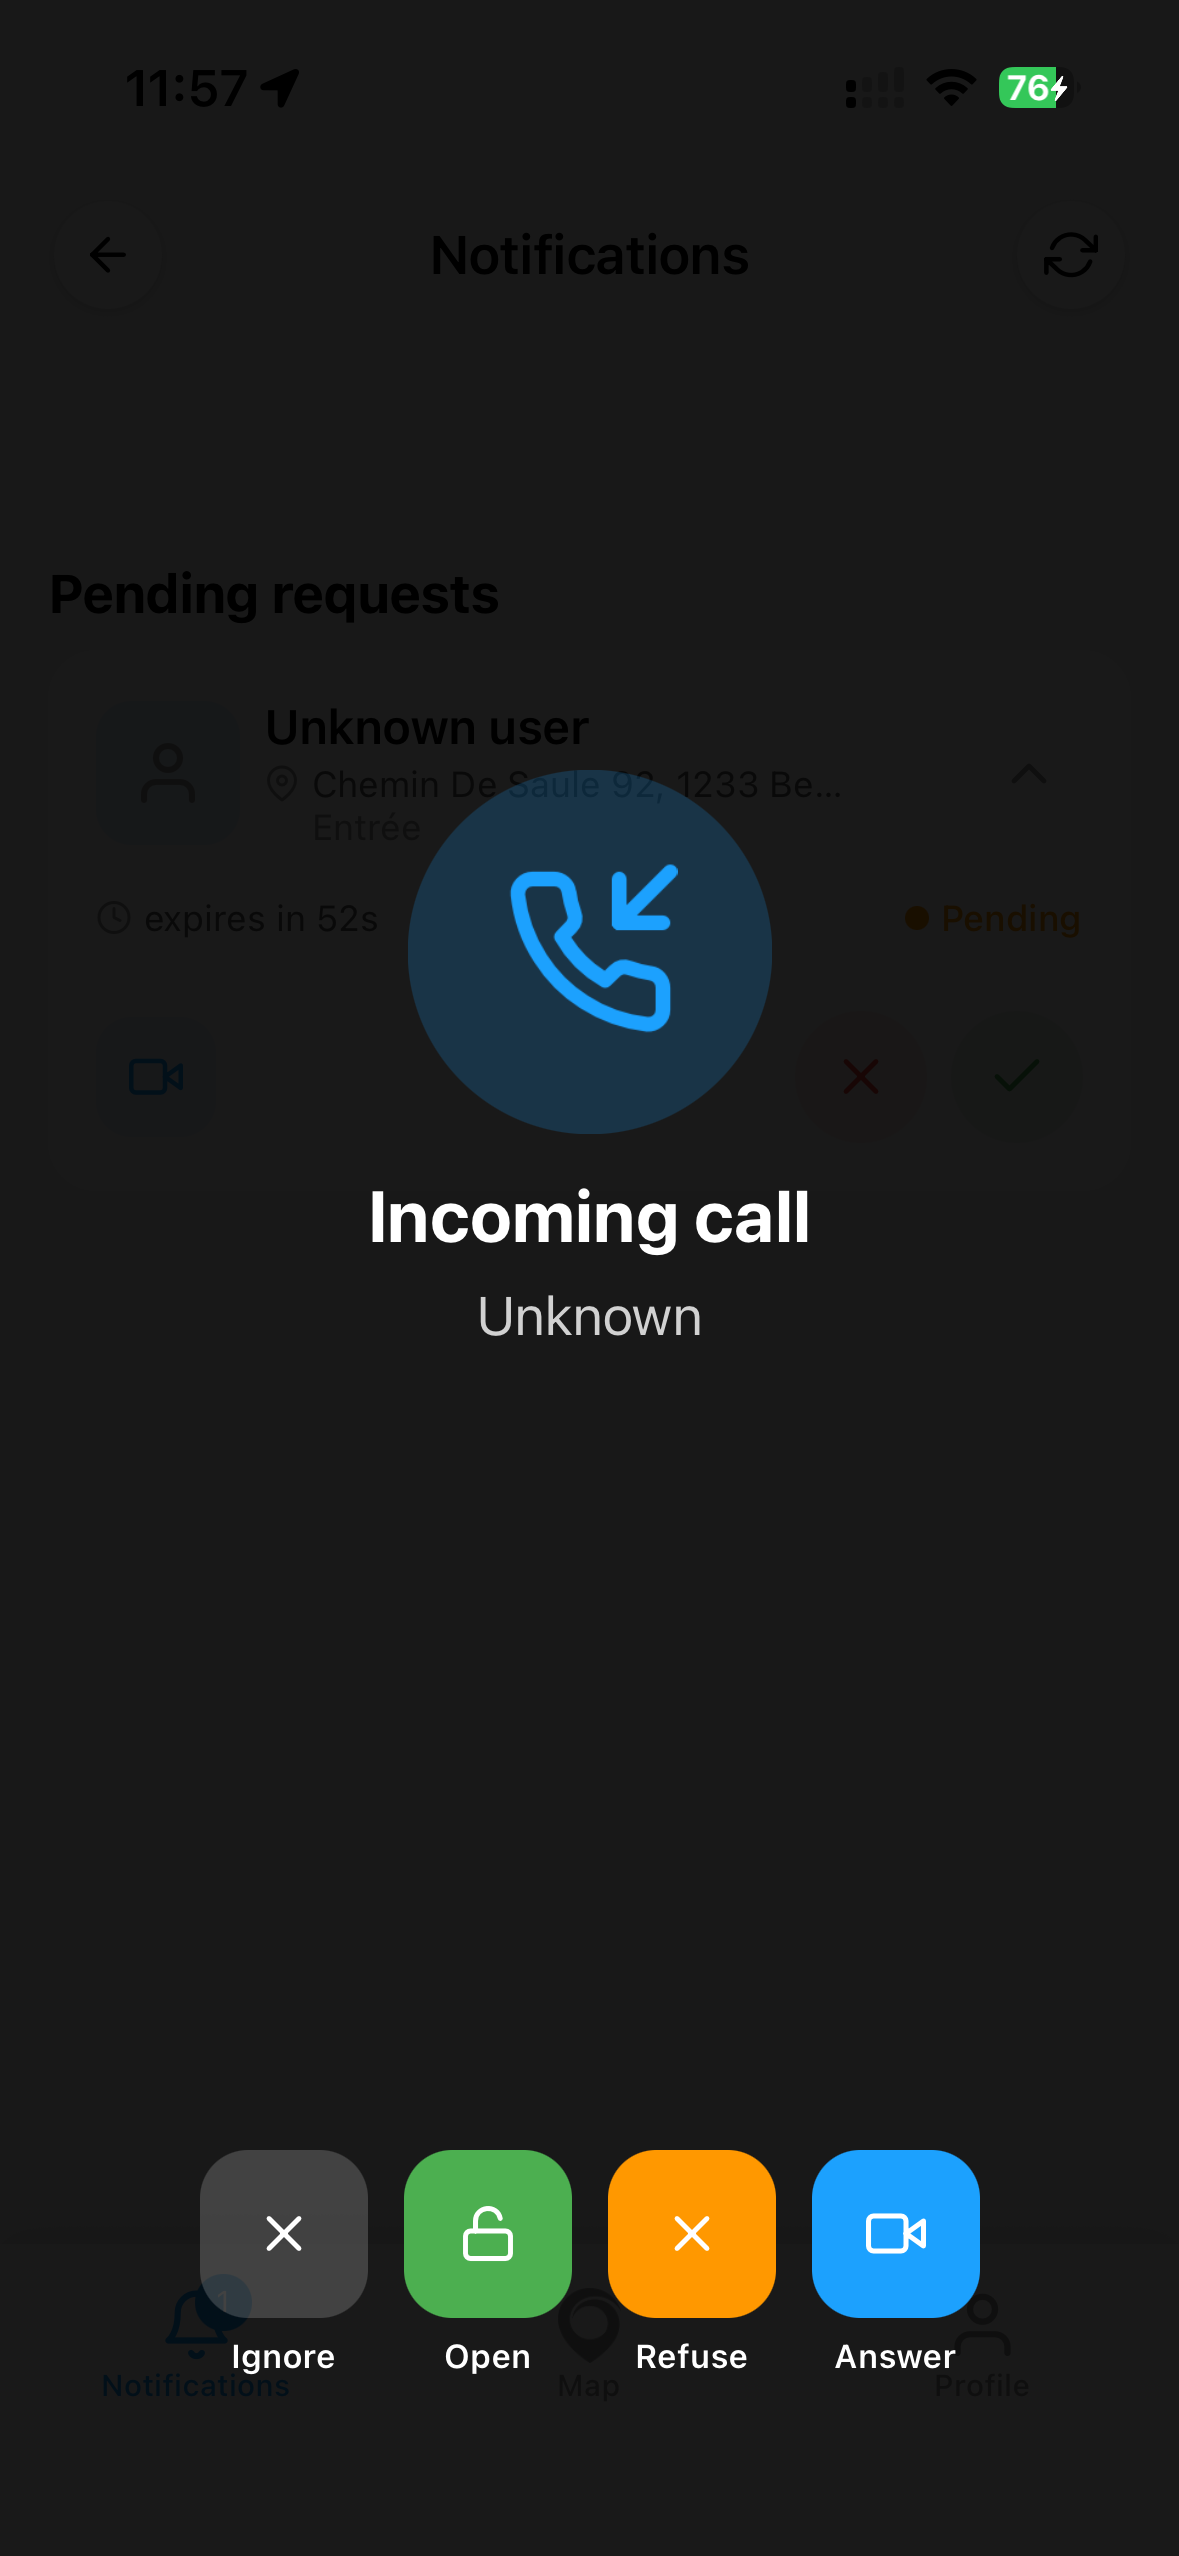
5. Notifications & Access Requests
The Notifications tab centralizes all access requests and history. Pending requests are displayed at the top of the list and expire automatically after 2 minutes if not answered. History is kept for 30 days. When viewing a request, you can tap the add person icon to open user creation and directly grant the requester authorized access.

5.1 Respond to a request
When a visitor requests access, you receive a push notification. You can:
- Accept : Opens the door remotely for the visitor
- Decline : Rejects the request
- Video call : Start a video call before deciding
5.2 Video call
When receiving a message request, you can tap the video icon to call the requester. The video call is one-sided: only the requester's camera is active, allowing you to verify their identity before opening the door. A requester can also initiate an access request directly via video call.


6. Profile & Settings
The Profile tab gives access to all your account settings and management options:
- My profile : Your personal information
- My BluSi Boxes : List of BluSi Boxes you have access to or administer
- Personal devices : Manage your phone and remotes
- Redeem invitation code : Accept an invitation to a BluSi Box
- Language : Change the app language
- Help & Support : Contact support
- About : App info, user manual, website link
- Log Out : Sign out of your account
- Delete my account : Permanently delete your account and all associated data
6.1 Redeem an invitation code
To join a BluSi Box, you need an invitation code or a QR code provided by an administrator or space administrator. There are several ways to receive one:
- After user creation, the administrator can share the QR code directly
- The administrator can tap on a pending invitation in the user list to access the QR code again
To redeem the code:

6.2 Delete your account
You can permanently delete your BluSi account at any time. This action is irreversible and will:
- Remove all your access rights to BluSi Boxes
- Delete all your registered devices
- Remove your account and personal data

7. Administration
Administrators can manage users, spaces, temporary access codes and BluSi Box configuration. Space administrators can manage users within their space. These rights are assigned when adding a user.
7.1 BluSi Box Details
Access BluSi Box details from Profile > My BluSi Boxes or by tapping the Details button on the map. Available options:
- Users : Manage BluSi Box users
- Temporary access : Create and manage temporary codes
- Edit : Configure BluSi Box information and permissions (administrator only)

7.2 Manage Users
The Users section shows all BluSi Box users. Each user can be an administrator (full management), a space administrator (user management within their space), or a simple authorized user.

Each user's status is visible:
- Active : The user has activated their account
- Pending : The invitation has not yet been accepted
7.3 Add a User
To add a new user to the BluSi Box:


7.4 Invitation Code
After creating a user, an activation code and a QR code are generated. Share them with the new user so they can activate their access:
7.5 Pending Invitations
Users who have not yet activated their invitation are displayed with a Pending status (orange). You can resend the invitation or delete it if needed.

7.6 Space Management
Spaces allow you to organize users by category (tenants, employees, family, etc.). Administrators can create and edit spaces. Space administrators can edit their own space.


Each space has visibility settings: you can configure whether the space is visible on the access request page, and restrict its visibility to specific spaces only.
When adding a user to a space, you can assign them the space administrator role, which allows them to manage members of that space.


7.7 Temporary Access
Temporary access codes allow you to create time-limited numeric codes for your guests (birthday party, delivery person, tradesperson, etc.).

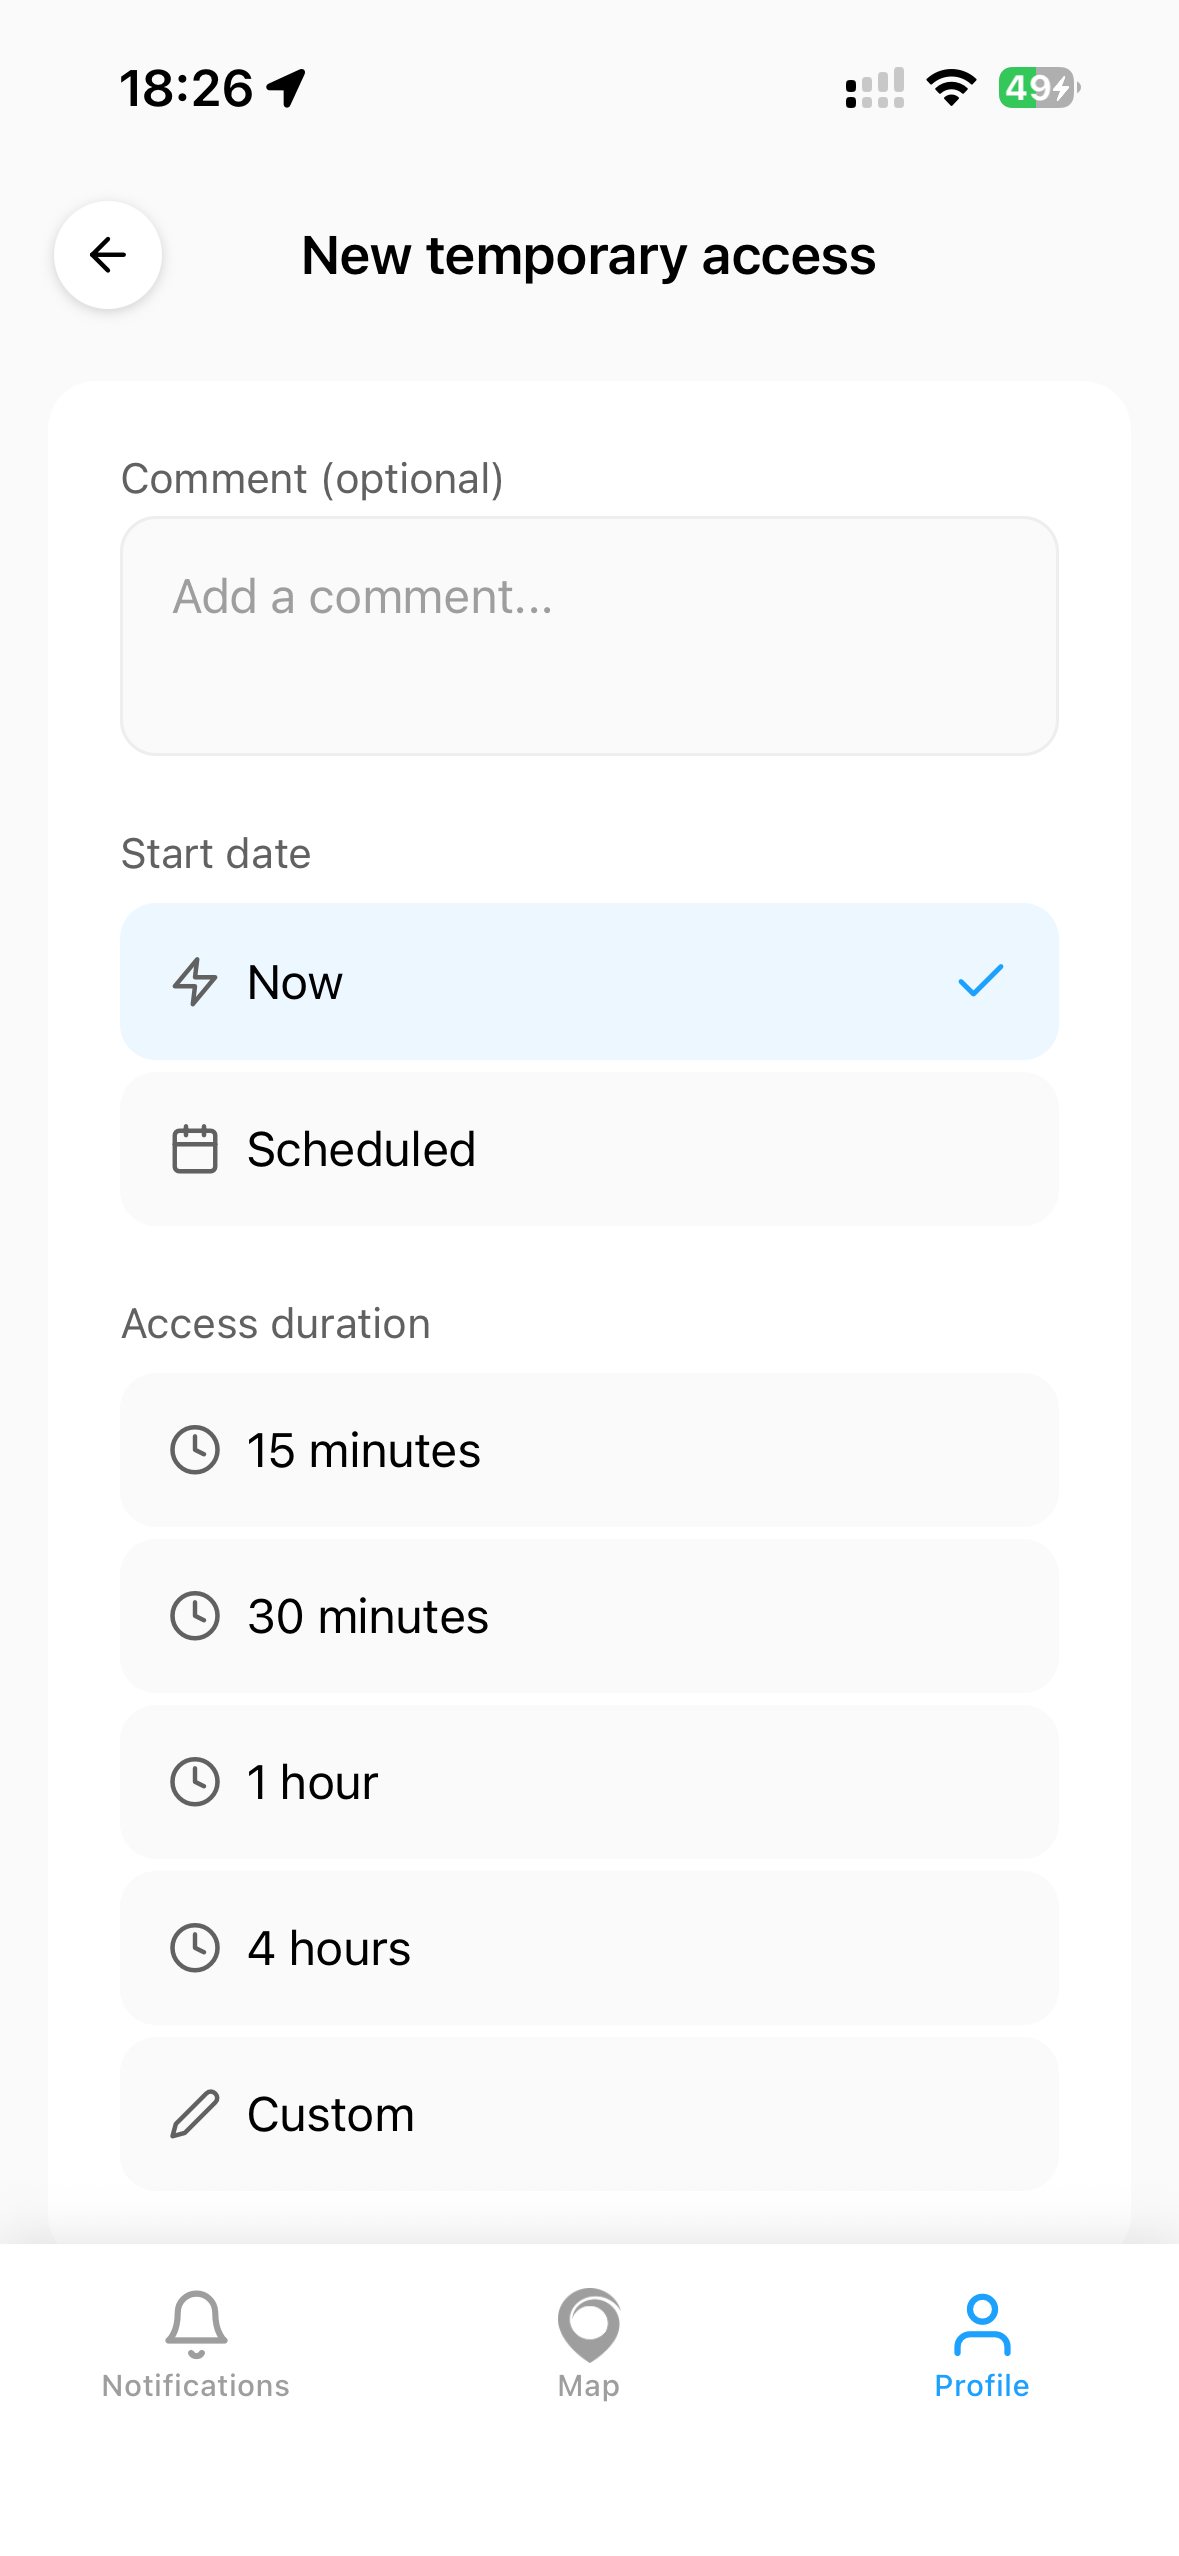
A 4-digit numeric code is generated. The maximum duration is 7 days. The code expires automatically at the end of the defined duration. The guest can use it by tapping the Code button on the map card and entering the 4 digits.
7.8 Configure the BluSi Box
Administrators can edit the BluSi Box information and permissions.
Information tab:
- Address : Property name or address (auto-search)
- Suffix : Additional detail (e.g., "Building entrance", "Garage")
- Location : GPS coordinates or map selection

Rights tab:
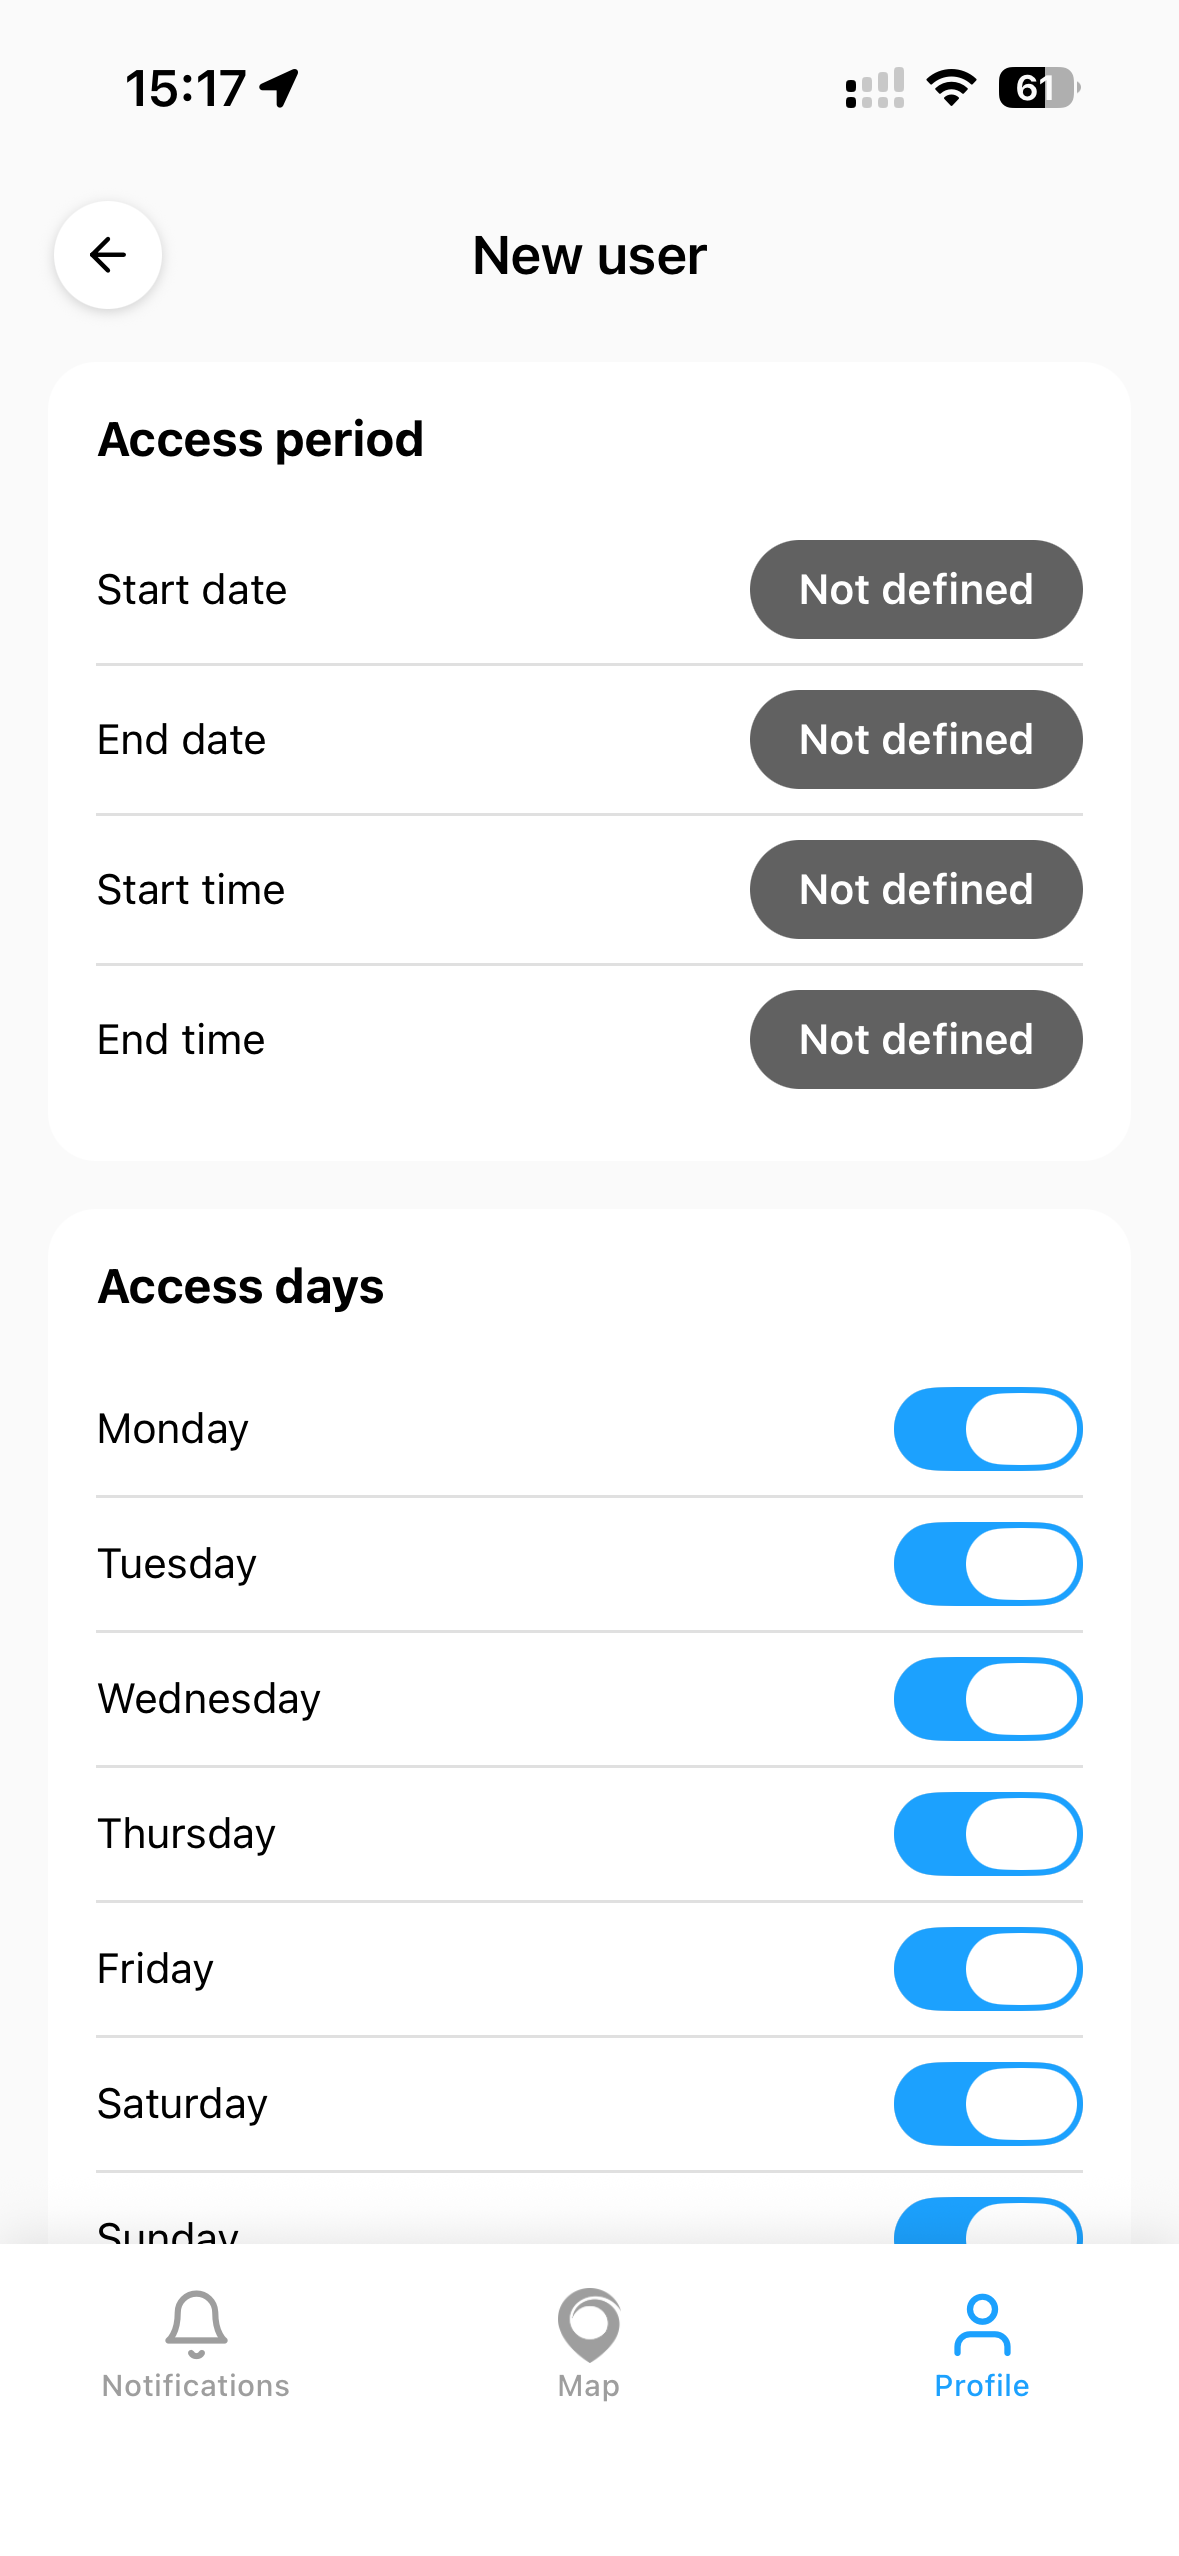
Automatic access lets users open the BluSi Box during a configured time window without sending an access request. By default this is limited to users logged in to the app, but it can be opened up to anyone (public entrance).
- Logged-in users only : When enabled (default), only users signed in to the BluSi app can open the door during automatic-access windows. When disabled, anyone opening the app, even without an account, can open during these windows. Turn this off only if you want a truly public entrance.
- Automatic access period : Set the start and end dates and times during which the door is automatically accessible
- Access days : Configure the days of the week for automatic access


7.9 Map Location
Set the BluSi Box location on the map so users can find it easily. You can place the marker manually or use GPS coordinates.

8. Devices & Remotes
BluSi allows you to associate multiple devices with your account: your main phone and additional BluSi remotes.
8.1 Device List
Go to Profile > My personal devices to see all your devices. Each device shows:
- The device name and model
- The unique device code
- The status (Active or Lost)
- The number of associated BluSi Boxes

8.2 Add a Remote
To add a remote control (BLE device):


8.3 Lost Device
If you lose a phone or a BluSi Remote:
- Mark as lost: the device will be blocked on associated BluSi Boxes
- Delete: permanently removes the device from your account
The lost device block becomes effective the next time any authenticated user opens the door with a phone on the associated BluSi Boxes.
9. Help & Support
If you encounter a problem or have a question:
- In the app: Profile > Help & Support
- By email: support@blusi.ch
- Dashboard: helderonline.ch/web